 OfficeOne AutoDateTime
Tutorial
AutoDateTime uses the date placeholder. You
need to insert in on the slide for AutoDateTime to place the current
date/time on the slide. To insert the date placeholder, do the following:
| PowerPoint 2021, 2019, 2016, 2013, 2010 |
|---|
|
You can now turn ON Automatic Date/Time updating as follows:
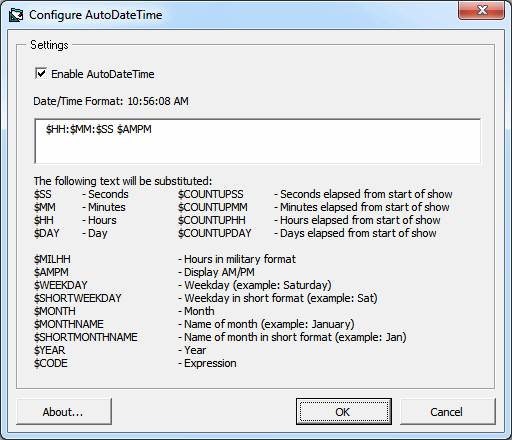
- In PowerPoint 2021, 2019, 2016, 2013 and 2010, click the Configure button in the AutoDateTime group in the Insert tab.
- In the Configure AutoDateTime dialog box, check the Enable
AutoDateTime box to turn ON automatic date/time updating.

- You can select the date/time format in the box. A preview of your
setting it shown next to the format label.
- Tip: You can use Ctrl+Enter key combination in date/time format box to get hard carriage returns.
- Click OK button.
- Now when you start the slide show, AutoDateTime will keep the date/time automatically updated.
Note that $CODE is not supported for 64-bit versions of Microsoft PowerPoint.
Placing the Date/Time display on the slide
AutoDateTime updates the date
placeholder with the current system date/time. If you wish to place the
date/time display at a different location, you will have to place the date
placeholder at that location. To place the date placeholder, go to the slide
master by selecting View | Master | Slide Master menu.
Locate the text box that contains the Date Area text. This is the text
box that AutoDateTime uses. Place it at the desired location. Close Slide
Master.
Displaying the Date/Time on certain slides only
AutoDateTime updates the "date" place holder with
the current system date/time. You can turn off displaying this placeholder on
certain slides. Use the following steps:
- Select View | Header and Footer... menu item.
- On the Slide tab, remove the check against Date and time box.
- Click Apply to All button. You have removed the date placeholder from all slides now.
- Switch to slide sorter view by selecting View | Slide Sorter menu item.
- Select all the slides on which you want the date/time to be displayed.
- Select View | Header and Footer... menu item.
- On the Slide tab, put a check against Date and time box.
- Click Apply button.